Shopifyテーマにはブログを表示するセクションがありますが、テキストだけのシンプルなお知らせ一覧を表示する機能がない場合が多いです。そこで、日本ユーザーに好まれるお知らせ表示機能を作成してみました。
目次
完成形
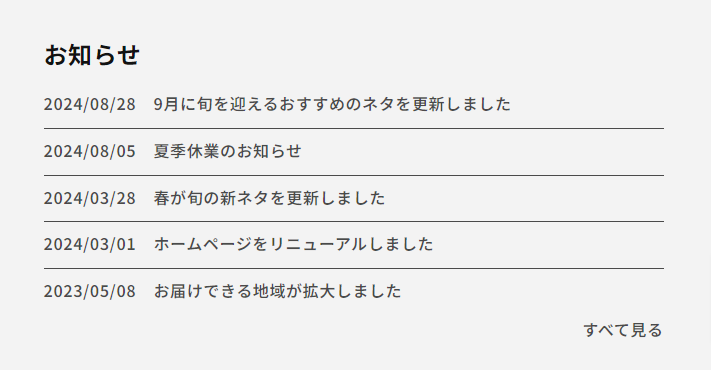
この記事では画像のようなシンプルなお知らせ一覧を表示する方法について解説していきます。機能一覧は下記をご覧ください。
主な機能
- 罫線は非表示にすることができます。
- 記事の表示数は1~20個で選択できます。
- 「すべて見る」は非表示にすることができます。
- 見出しの位置は左・右・中央に変更できます。
- セクションの横幅は変更できます。
- 各記事へリンクしないように設定することができます。
設定方法
セクションを追加する
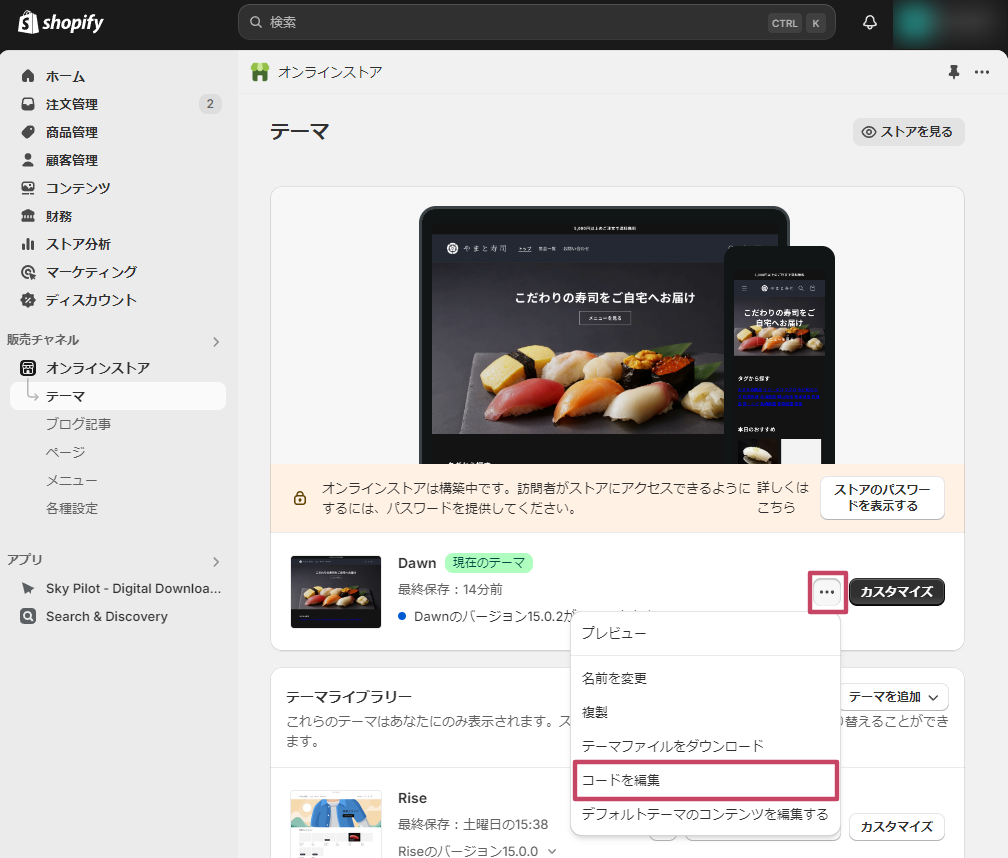
「オンラインストア > テーマ 」から実装したいテーマのメニュー開き「コードを編集」をクリックします。
※既にサイトを公開している方はテーマを複製して作業してください。複製テーマでは現在公開中のテーマに影響を与えることなく変更を行うことができます。
左側の「sections > 新しいセクションを追加する」をクリックしてください。
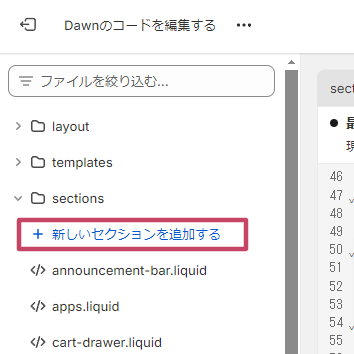
Liquidにチェックを入れたまま、ファイル名に「news-list」を入力し「完了」を押してください。


右の赤枠部分に下記のコードをすべて貼り付けます。
Liquid
{% assign articles = section.settings.blog.articles %}
<div class="news color-{{ section.settings.color_scheme }}">
  <div class="page-width">
    {% if section.settings.heading %}
      <h2>{{ section.settings.heading }}</h2>
    {% endif %}
    <div class="news-list">
      {% for article in articles limit: section.settings.post_limit %}
        {% if section.settings.link_article%}
          <a class="news-list-item" href="{{ article.url }}">
        {% else %}
          <div class="news-list-item" href="{{ article.url }}">
        {% endif %}
          <date>{{ article.published_at | date: '%Y/%m/%d' }}</date>
          <span>{{ article.title }}</span>
        {% if section.settings.link_article%}
          </a>
        {% else %}
          </div>
        {% endif %}
      {% endfor %}
    </div>
    {% if section.settings.show_view_all %}
      <a class="view-all" href="{{ section.settings.blog.url }}">{{ section.settings.view_all_text }}</a>
    {% endif %}
  </div>
</div>
{%- style -%}
  .section-{{ section.id }}-padding {
    padding-top: {{ section.settings.padding_top | times: 0.75 | round: 0 }}px;
    padding-bottom: {{ section.settings.padding_bottom | times: 0.75 | round: 0 }}px;
  }
  @media screen and (min-width: 750px) {
    .section-{{ section.id }}-padding {
      padding-top: {{ section.settings.padding_top }}px;
      padding-bottom: {{ section.settings.padding_bottom }}px;
    }
  }
  .news {
      padding-top: {{ section.settings.padding_top }}px;
      padding-bottom: {{ section.settings.padding_bottom }}px;
  }
  .news .page-width{
      max-width: {{ section.settings.section_width }}px;
  }
  .news h2{
      text-align: {{ section.settings.heading_align }};
  }
  {% if section.settings.show_line %}
    .news .news-list-item{
        border-bottom: solid 1px;
        padding: 0 0 10px;
    }
    .news .news-list-item:last-child{
        border-bottom: none;
    }
  {% endif %}
  .news {
    margin: 0 auto;
  }
  .news a {
      color: currentColor;
      text-decoration: none;
      transition: opacity 0.25s;
  }
  .news a:hover {
      opacity: 0.7;
  }
  .news .news-list {
      display: grid;
      row-gap: 7px;
  }
  .news .news-list .news-list-item {
      display: grid;
      grid-template-columns: auto 1fr;
      gap: 20px;
  }
  .news .view-all {
      display: block;
      text-align: right;
  }
{%- endstyle -%}

{% schema %}
{
  "name": "お知らせ",
  "tag": "section",
  "disabled_on": {
    "groups": ["header", "footer"]
  },
  "settings": [
    {
      "type": "text",
      "id": "heading",
      "default": "お知らせ",
      "label": "見出し"
    },
    {
      "type": "select",
      "id": "heading_align",
      "options": [
        {
          "value": "left",
          "label": "左"
        },
        {
          "value": "center",
          "label": "中央"
        },
        {
          "value": "right",
          "label": "右"
        }
      ],
      "default": "left",
      "label": "見出しの位置"
    },
    {
      "type": "blog",
      "id": "blog",
      "label": "ブログを選択"
    },
    {
      "type": "range",
      "id": "post_limit",
      "min": 1,
      "max": 20,
      "step": 1,
      "default": 5,
      "label": "記事の表示数"
    },
    {
      "type": "checkbox",
      "id": "link_article",
      "default": true,
      "label": "各記事ページへリンクする"
    },
    {
      "type": "checkbox",
      "id": "show_line",
      "default": true,
      "label": "罫線を表示する"
    },
    {
      "type": "checkbox",
      "id": "show_view_all",
      "default": true,
      "label": "記事一覧リンクを表示する"
    },
    {
      "type": "text",
      "id": "view_all_text",
      "default": "すべて見る",
      "label": "記事一覧リンクのテキスト"
    },
    {
      "type": "range",
      "id": "section_width",
      "min": 600,
      "max": 1600,
      "step": 10,
      "unit": "px",
      "default": 600,
      "label": "セクションの横幅"
    },
    {
      "type": "color_scheme",
      "id": "color_scheme",
      "label": "t:sections.all.colors.label",
      "info": "t:sections.all.colors.has_cards_info",
      "default": "scheme-1"
    },
    {
      "type": "header",
      "content": "セクションの余白"
    },
    {
      "type": "range",
      "id": "padding_top",
      "min": 0,
      "max": 100,
      "step": 4,
      "unit": "px",
      "label": "上部の余白",
      "default": 36
    },
    {
      "type": "range",
      "id": "padding_bottom",
      "min": 0,
      "max": 100,
      "step": 4,
      "unit": "px",
      "label": "下部の余白",
      "default": 36
    }
  ],
  "presets": [
    {
      "name": "お知らせ"
    }
  ]
}
{% endschema %}
すべて見る
保存したらこの画面の作業は完了です。
オンラインストアに表示する
「オンラインストア > テーマ > カスタマイズ」と進みます。
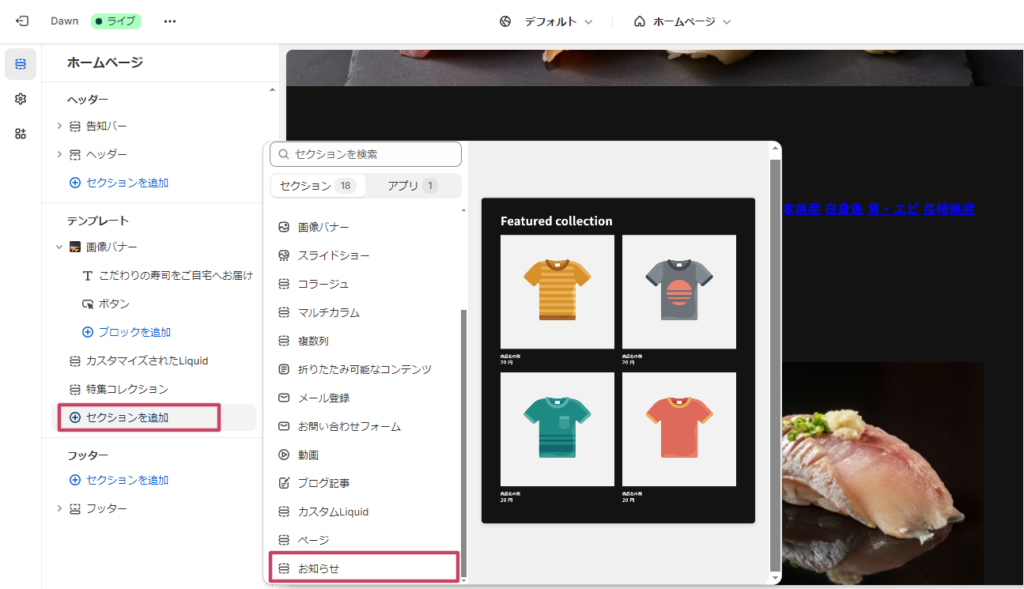
「セクションを追加」をクリックします。「お知らせ」という項目が新しく追加されていますのでこちらを選択してください。
セクションはドラックで好きな場所に移動できます。
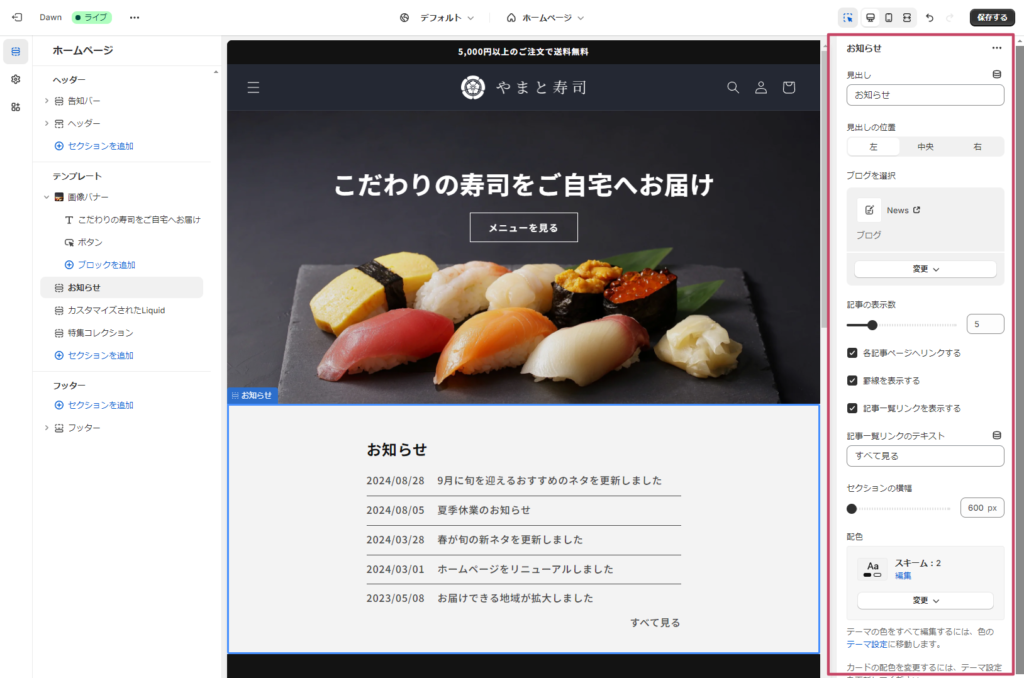
お知らせセクションを選択すると設定画面が表示されますので、下記に従って設定してください。
| 見出し | 見出しに表示するテキスト、空白で非表示 |
|---|---|
| 見出しの位置 | 左・中央・右から選択 |
| ブログを選択 | お知らせ用に作成したブログを選択 |
| 記事の表示数 | 1~20で記事表示数を選択 |
| 各記事ページへリンクする | 記事詳細ページへのリンクを有効にする |
| 罫線を表示する | 罫線の表示・非表示を選択 |
| 記事一覧リンクを表示する | 「すべて見る」の表示 |
| 記事一覧リンクのテキスト | 「すべて見る」の文言の変更 |
| セクションの横幅 | セクションの横幅を調整 |
保存したら完了です!

コメント